
Option Chain
Option Chain provides a standard view into the full option market for a selected option series. Market data for all options is displayed, as well as Rival’s calculated theoretical values and Greeks. In addition, users may build and RFQ option spreads directly from Option Chain.
Selecting Option Series
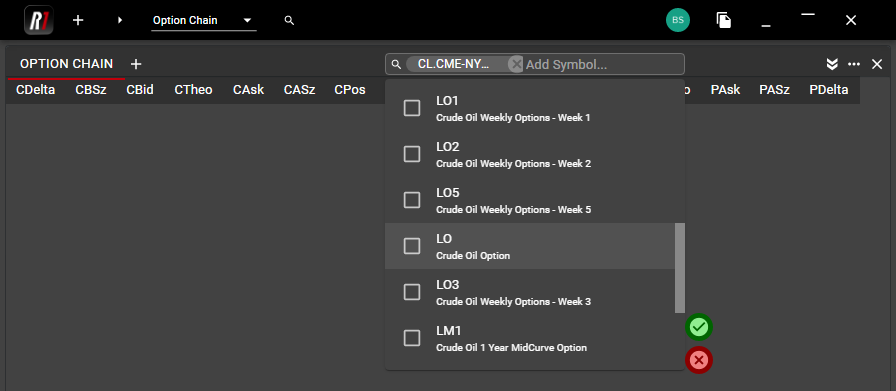
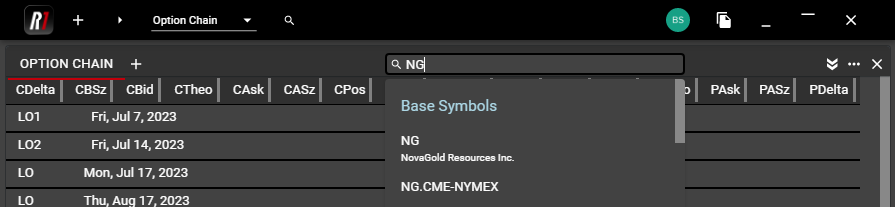
Option symbols are classified by Base Symbol in the Option Chain. Once an Option Chain is added to the workspace, use the Search bar at the top of the component to select a Base Symbol. For options on futures, the Base Symbol will be the underlying future symbol and will have the exchange appended. For options on equities, the Base Symbol will be the same as the option symbol in most cases.
In this example, searching for Base Symbol CL will provide results for both an equity with the CL symbol, as well as the underlying CL future, listed at CME-NYMEX

Once the Base Symbol has been selected, all Option Symbols within the product family are available to be selected. Users may select individual option series or may use ‘Select All’ to add all series. After making Option Symbol selections, all listed terms for the selected symbols will be displayed chronologically in Option Chain.

Clicking on any term header will expand that term and will auto-center to the at-the-money strike, based on the current price of the underlying future or equity.

Additional Option Symbols may be added to the same tab of the Option Chain by searching again for Base Symbol and selecting additional series. Regardless of symbol, all terms will be displayed chronologically.

Most users, however, will choose to segregate their option series by product, which can be easily accomplished by adding tabs to Option Chain in the same manner as with other components in the workspace.

Market Data in Option Chain
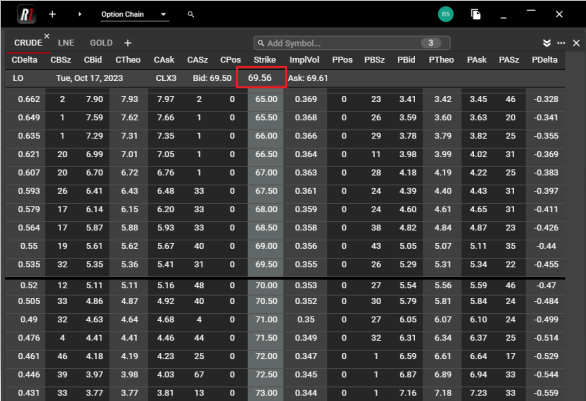
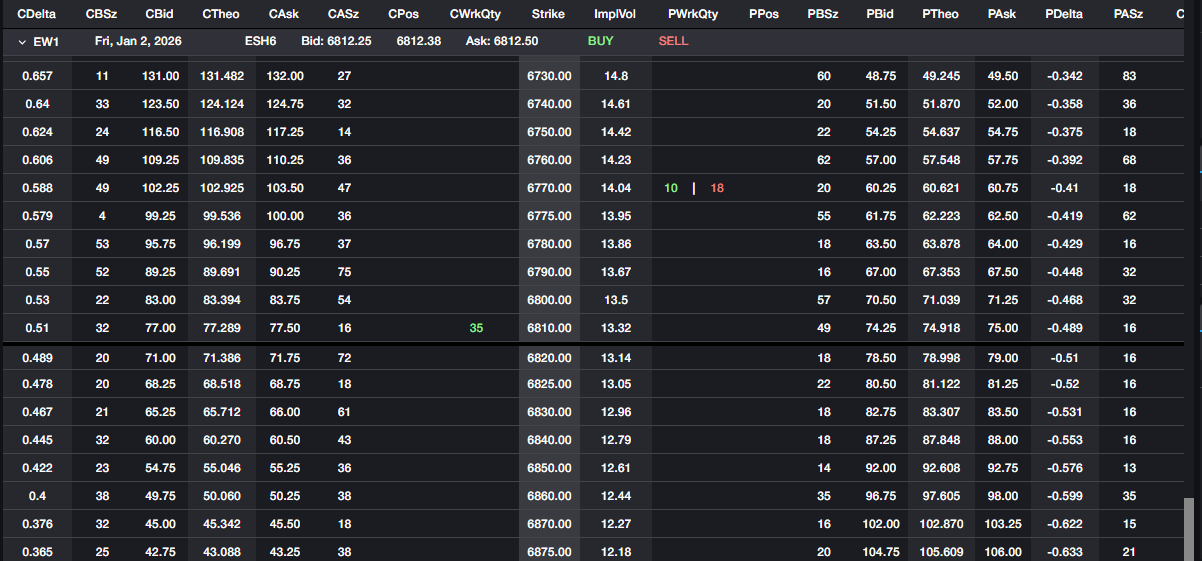
When an individual term is expanded, all strikes for that term are displayed. The driving contract--the underlying future or equity—is displayed in the term header, with current bid, ask and midpoint. All theoretical values are based on the midpoint price of the driving contract.
Users have the ability to add and rearrange columns at any time, in the same manner as with other components in the workspace. The full column list can be found using the 'Show Columns' selection in the ellipsis menu for the Option Chain.
In order to collapse an individual term, click on the term header. When collapsed, the most recent term header will appear at the top of the visible range of the Option Chain. Any number of term headers may be expanded concurrently. To center a term to the at-the-money strike, double click on the Strike column header to center.
Theoretical Values and Greeks
All displayed theoretical values and Greeks are calculated using Rival's autofit mechanism. Autofit will update with any move in the driving contract or any change to the market bid/ask. At this time, users do not have the ability to set their own volatility curve. However, the implied volatility generated by Rival's autofit is displayed for each strike. Columns for all values derived by Rival are shown with a lighter background color than those for market data.

Executing from Option Chain
Users may execute orders on individual options directly from the Option Chain. A single left-click on the Bid for an option will open a standard Order Ticket defaulted to Sell. Conversely, a single left click on the Ask will open an Order Ticket defaulted to Buy. The side, quantity, price, order type and TIF may be adjusted in the Order Ticket before sending the order.
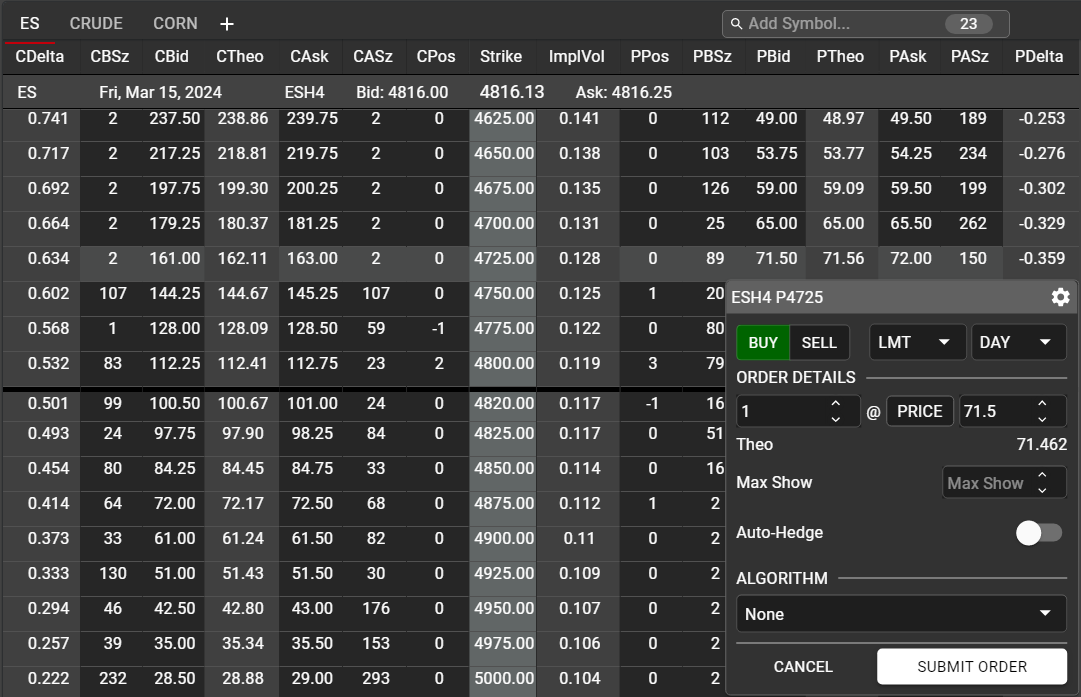
When an Order Ticket is opened, the strike will be highlighted for ease of viewing, until an order is sent or the Order Ticket is closed manually.
Autohedging
Rival provides an Autohedge feature which can be employed on outright options or option spreads. When an Order Ticket is opened for a qualifying instrument (option or spread) a Hedge checkbox is exposed. By default, this is unchecked. Selecting Hedge before sending the order will initiate the Autohedge feature

Autohedge reads the total Delta of the option order and will send a market order for the appropriate number of underlying contracts (futures or stock) to hedge the executed option quantity. The hedge will be in the assigned underlying contract and will be displayed in the Trade Book once executed.

Autohedge will hedge with an underlying threshold of 0.70, meaning that if the hedge quantity would be 0.7 futures (stock) or more, the hedge order will be sent. Any fraction of a future (stock) under 0.70 will not result in a hedge order. A future enhancement will allow users to set this threshold to a different value if desired.
Managing Orders in Option Chain
All working option orders can be viewed and managed from the Option Chain by adding the Working Quantity columns (CWrkQty and PWrkQty). These columns will display the total working quantity on each strike.
Buy quantities will be displayed in Green and Sell quantities in Red. In the above screenshot, the user has an order to buy 35 6810 Calls. User also has multiple orders on the 6770 Puts, with total working Buys equal to 10 and total working Sells equal to 18.
Users have the ability to manage these orders directly from those quantity displays using the Floating Order Book. Hovering over a quantity will display details for all orders on a particular strike.
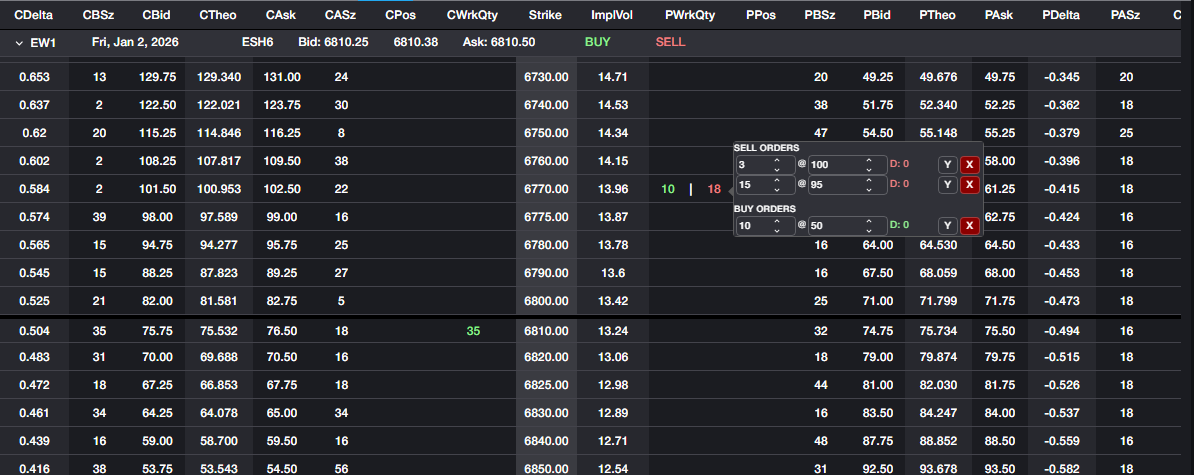
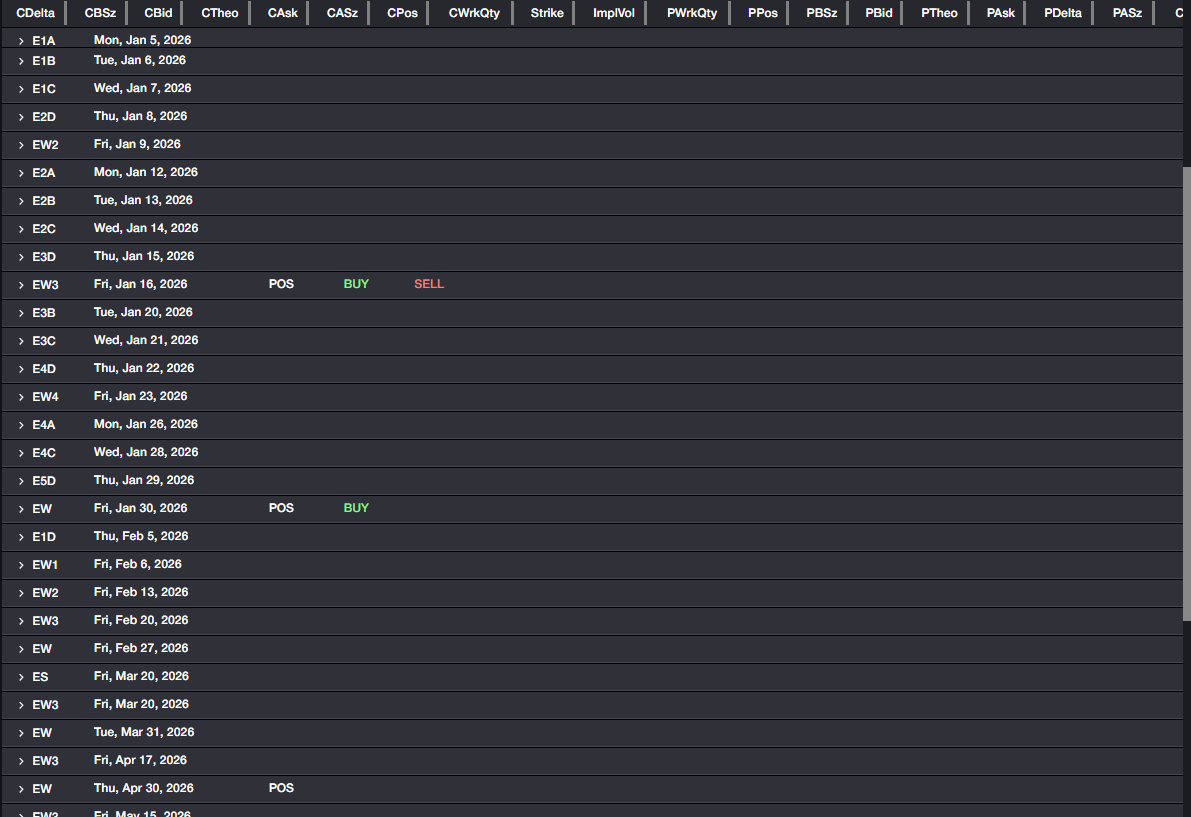
If users have working orders or positions in any option series, those indicators will be present in the Term header and visible when the Term is expanded, as seen above, as well as when Terms are collapsed as shown below.
Spread Building
Option Chain provides two distinct methods to build and RFQ option spreads directly, using a Floating Spread Builder.
There are two methods by which users can select instruments to be included in their spread.
Building Spreads using Theoretical Value columns:
A single click on a Theoretical Value in Option Chain will initiate the spread building process. Once an instrument is selected using this method, the Floating Spread Builder will launch with the user's selection.
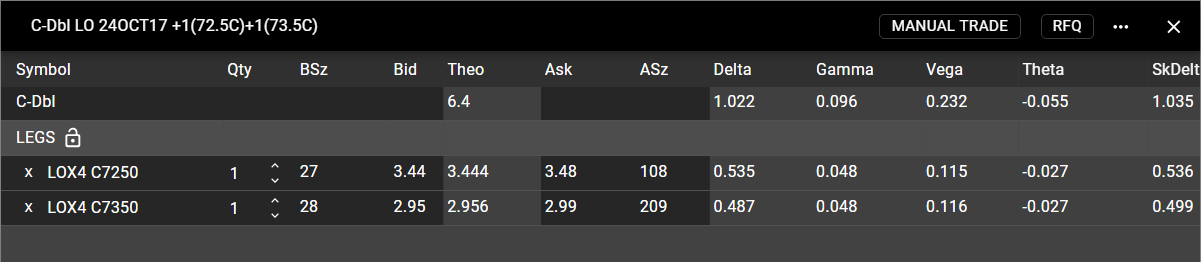
Once Spread Builder has been launched, users may add legs of a spread by clicking on additional Theoretical Values within the Option Chain. A left click on a Theoretical Value will add a leg to the spread as a buy, while a right click will add the leg as a sell. In the example below, the user has left clicked on the 72.50 Call and then right clicked on the 73.50 Call.
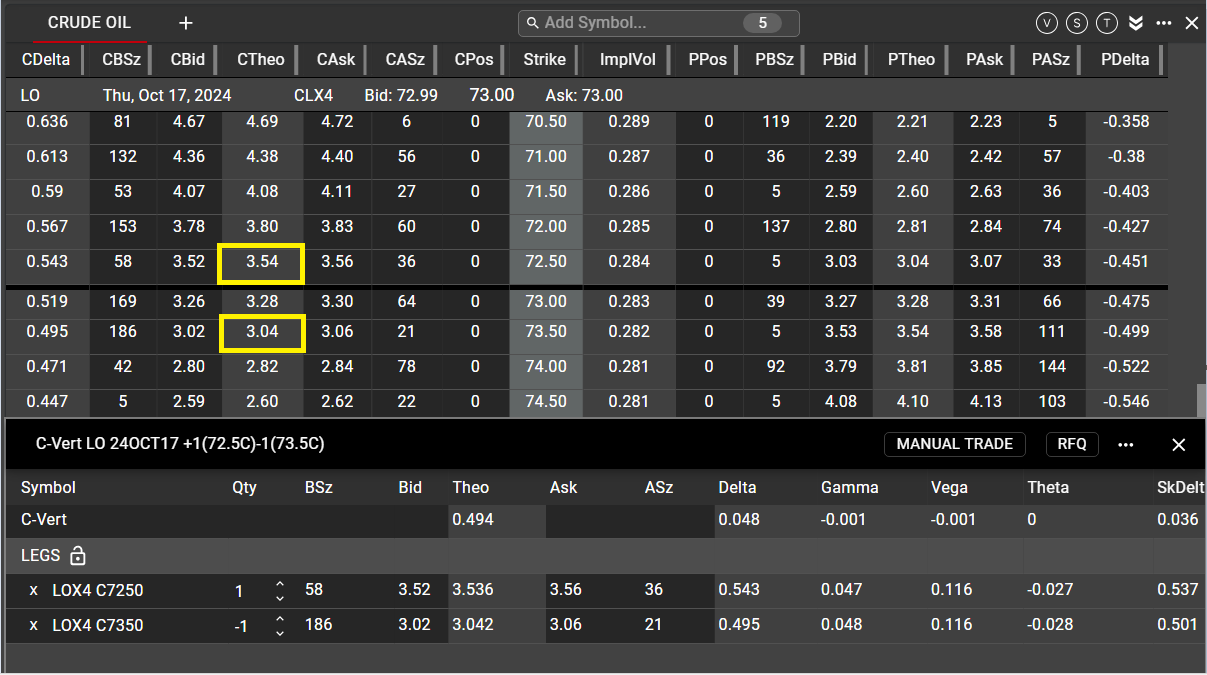
Now that multiple legs have been selected, Spread Builder will recognize the structure as a supported Spread Type--in this case, a Call Vertical (C-Vert). If the structure is not a supported Spread Type, it will be listed as a Generic (Gen) spread.
Users may adjust the quantities and direction of the legs of their spread at any time. For example, changing the quantity on the 73.50 Call in the above example to two will cause Spread Builder to recognize the spread as a Call 1x2 Ratio Spread (C-1X2). Changing the direction of the 73.50 Call will cause Spread Builder to recognize the spread as a Call Double (C-DBL)

In the above examples, no market data is present for the selected spread, indicating that the spread has not yet been created at the exchange. Users may RFQ directly from the Spread Builder in order to receive a response from the market. Market data will populate automatically once a market is made on the spread. If a spread is already listed at the exchange, market data will populate at the time the spread is selected by the user.
Once the spread has been created and listed, users may enter orders on the spread directly from the Spread Panel by left-clicking Bid or Ask to open an Order Ticket.

Building Spreads using Strike columns:
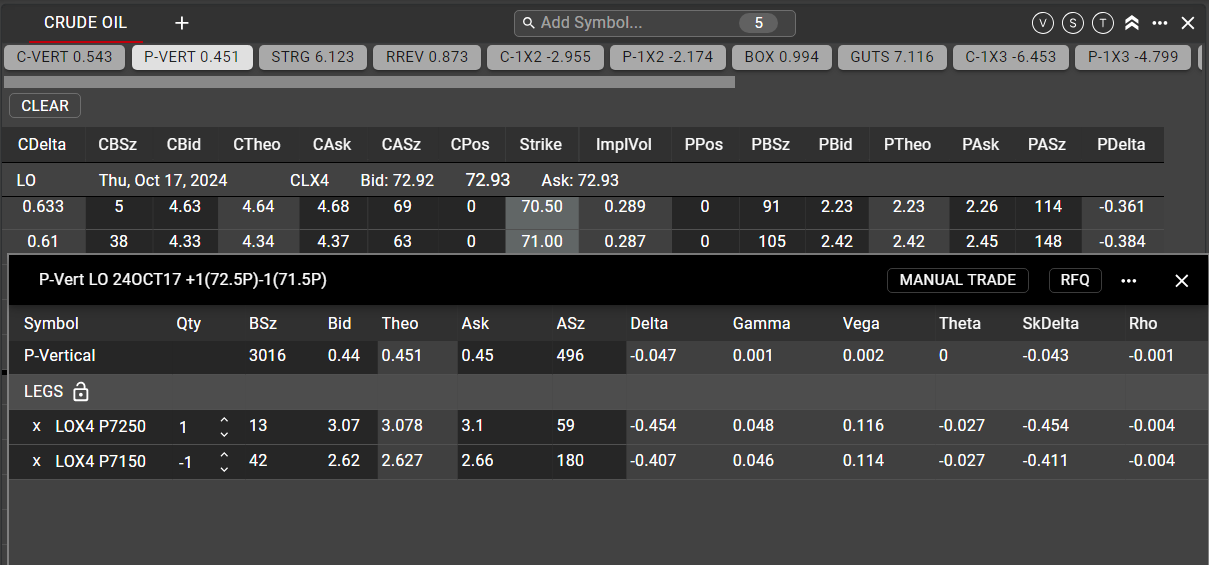
Using the 'strike' method will allow users to see all possible spread combinations involving specific strikes. When Strikes are selected, the spread choices available to the user will include all possible combinations for both the Call and the Put for the selected strike, allowing the user to choose from several spreads. Use left click to select desired strike(s) in the Option Chain.

In the above example, when only one strike is selected, the available choices are shown for the Call, the Put, and for both Call and Put, which in this case includes only the Straddle and the Combo on the 72.50 strike. Once a strike is selected, the Spread Panel in the Option Chain will be exposed. Users can expand/collapse the Spread Panel at any time by using the Chevron in the upper right corner of the Option Chain.
Once a second strike is selected, users will see additional choices which will encompass one or both of the Call/Put on each strike. Below, selections for any spread which includes the Call or the Put on both the 71.50 and 72.50 strikes are shown

In all cases, the spread descriptions which include the user's selected strikes are displayed with either a white or a grey background. The white background indicates that the spread is currently listed on the exchange. In the above example, the only spread combination currently listed is the Put Vertical (P-Vert). All other combinations have Rival's calculated theoretical value displayed, but these spreads are not currently listed at the excahnge, and users will need to send an RFQ for those spreads to get a market returned.
Clicking on a spread selection button will launch the Floating Spread Builder, with the user's selected spread classification. Below, user has clicked the P-Vert button, resulting in the details of that spread being displayed on the top line of the Floating Spread Builder, with details for each leg below.
Covering/Locking Options and Spreads
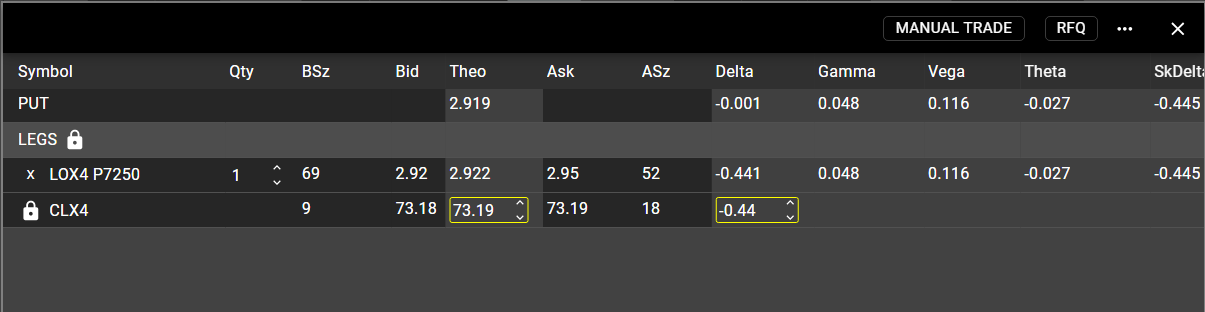
Sometimes referred to as a Delta-neutral strategy, users can create covered options and covered option spreads by adding an underlying leg to their Spread Builder. In order to add an underlying (Stock or Future) leg, click the Lock icon once the spread has been built. When clicked, the assigned underlying leg will be added as a leg of the spread.

By default, Rival's calculated Delta for the spread will be displayed in the Delta field on the underlying leg, highlighted in yellow. The underlying price will be populated using the last traded price of the underlying contract. Users may then amend these values to specify the Delta (ratio) at which they want to quote or execute the covered spread as well as the underlying price. This can be done for outright options as well as spreads:
Users may RFQ covered spreads in the same manner as regular option spreads, and may execute them and/or drag them to Hotwatch/Ladder in the same manner as regular spreads.
Creating Calendar spreads and Strips
Using the Calendar function in the Spread Builder, users can easily build a Calendar spread or a strip without the need to select each individual option in the desired spread. In the example below, the user has selected the LO Nov 15 68 put by clicking on the Theo value for the put in the Option Chain.
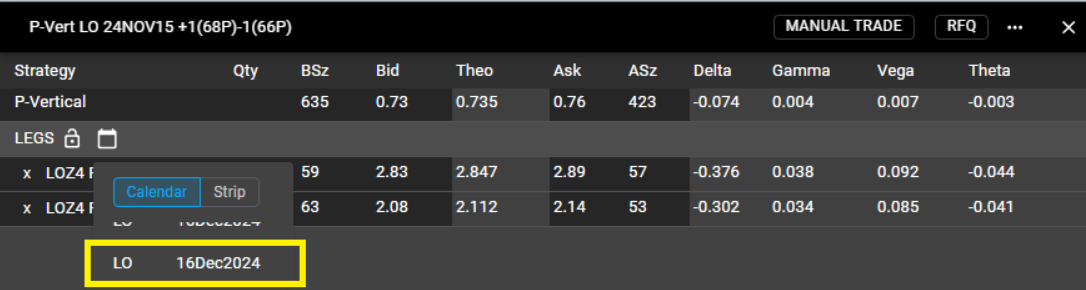
Clicking the calendar icon in the Spread Builder will expose all Terms that also contain the 68 Put. Note that terms are listed based on the Base Symbol and not exclusively on the selected option symbol. This allows users to build Calendar Spreads across Terms with different symbols that belong to the same option product family. In addition to the standard LO options on Crude Oil in this case, the user can select any daily or weekly Term within the CL/LO complex.
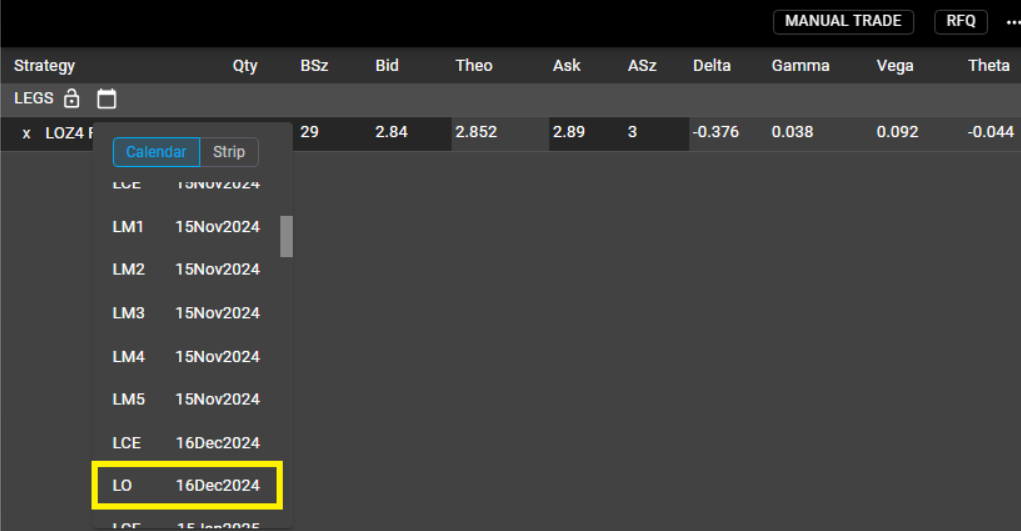
When Calendar is selected from the top of the modal, a single click on another Term will automatically generate a Calendar spread within the Spread Builder. Here, the user has selected the LO Dec 16, 2024 Term as the second leg of the Calendar Spread, generating the spread below.
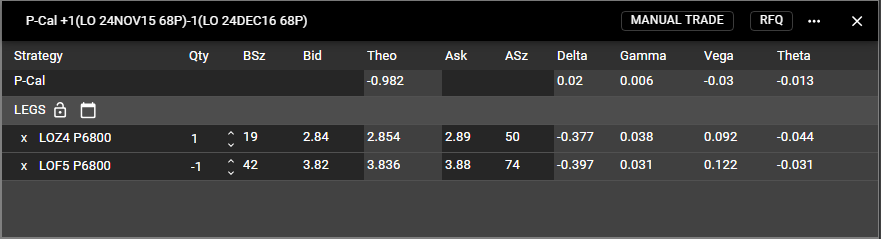
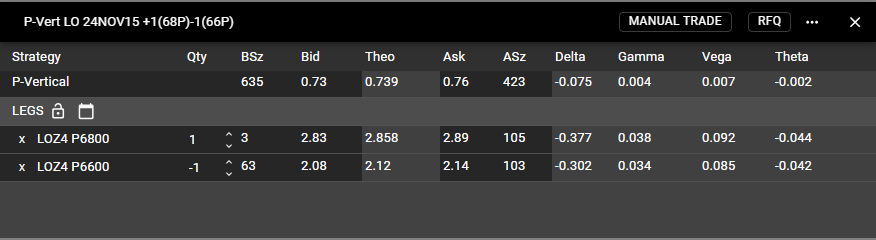
Using the same method, users can create a Calendar Spread from any option spread. Below, the user has created a LO Nov 66/68 Put Vertical. Using the Calendar feature in the same manner, the user can create a LO Nov/Dec 66/68 Put Spread Swap.

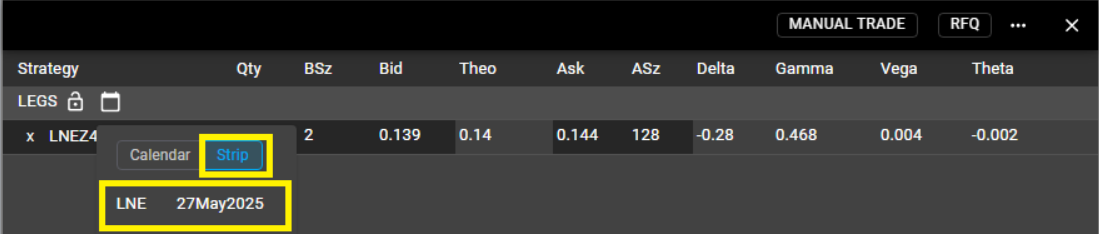
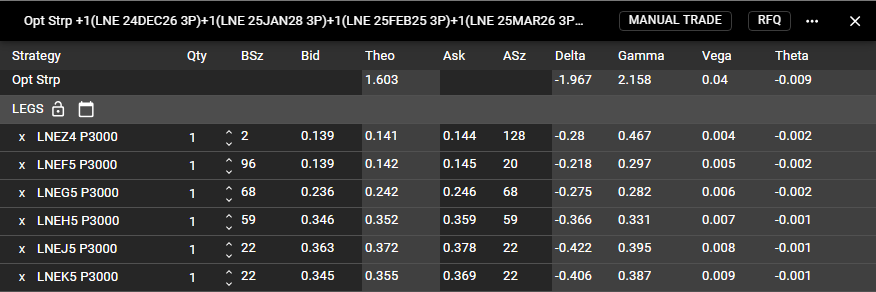
The same method can be used to create a Strip from a single option or from an option spread. In the below example, LNE options are used, as they are more commonly traded as Strips. User has selected the LNE Nov 3.00 Put and wishes to create a Nov/May 3.00 Put Strip. Selecting May as the deferred Term will result in a Strip being generated, containing all Terms in between the first Term and the selected deferred Term
Execution for Spreads
As mentioned, once a spread has been created in the Spread Builder, users can trade on it by opening an Order Ticket directly from the spread Bid/Ask in the Spread Buil;der. In addition, users can drag the instrument, using left-click-drag, to a Hotwatch or to a Ladder for observation and execution.
Note that an instrument may only be dragged in this manner once it is listed on the exchange. If the spread is built in the user's Option Chain but has not been RFQ'd, it may not be dragged.
The same behavior is available from the spread selection buttons. Users may drag an existing spread from those selection buttons to a Hotwatch or a Ladder. If the spread button is shaded white, it may be dragged to another component, but if the button is shaded grey--indicating that the spread is not yet listed at the exchange--it may not be dragged.
Manual Trades
From the Floating Spread Builder, users have the ability to enter trades manually. This is most often used when executing a trade outside of Rival One that needs to be tracked in the Rival One position.
Please note that all manual trades are subject to Compliance position limits. All position limits (Long, Short, Net, Gross) are checked when a manual trade is entered. The only limit that is not checked is Max Order Qty. Because manual trades can affect compliance limit consumption, users must be permissioned before they can enter manual trades. All users designated as Risk Managers will have the ability to enter manual trades, but a designated Risk Manager can allow a Trader the ability to enter manual trades by making the request to Rival Support.
If permissioned for manual trades, users will see the Manual Trade control in their Spread Builder once a spread or an outright instrument has been added. If not permissioned, the Manual Trade button shown in the screenshot below will not be visible to the user

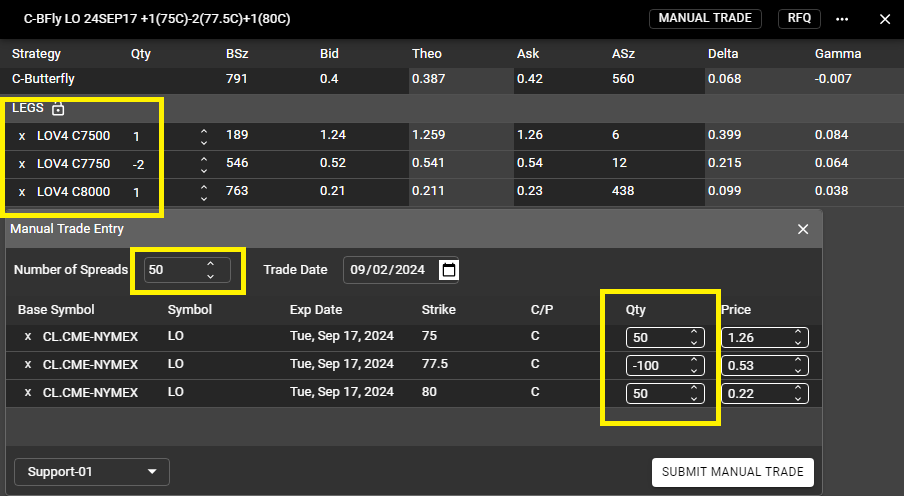
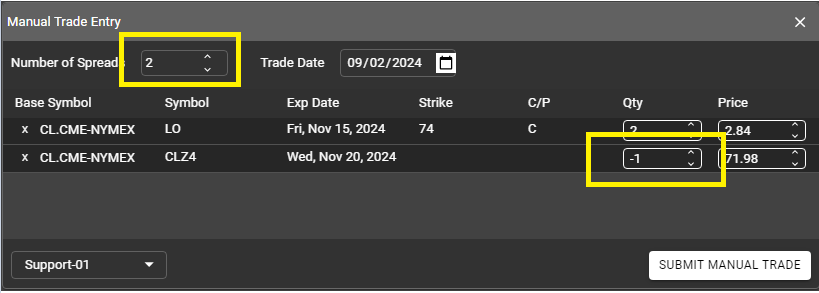
Once selected, the manual trade modal will be displayed, with the details of the spread as specified in the Spread Builder. From here, users can change the quantity and price of the legs of the spread and may use the lot multiplier (aka Number of Spreads) to adjust the total quantity. In the example below, the user has created a Butterfly spread and has used the lot multiplier to quickly specify the number of spreads executed, without the need to adjust each leg individually.
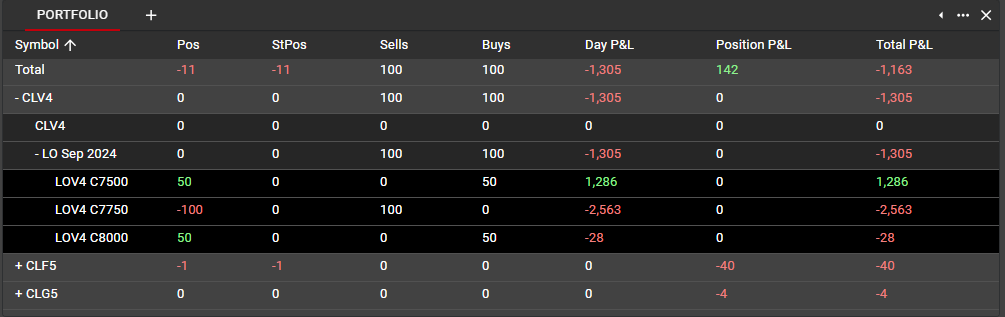
Adding the manual trade using the Submit button will trigger a compliance check for the total position. If successful, the manual trade will be displayed in the Trade Book, and the position will be reflected in the Portfolio. If the trade fails any compliance check it will be rejected with the same reject message as a standard click trade that fails compliance.

Once entered, users have the ability to delete manual trades from the Trade Book, using the delete icon in the Manual Trade column. If deleted, the positions will be removed from the Portfolio, but the trades will remain displayed in Trade Book as 'struck' so that the user retains all information about delete and modify actions.

Manual entry of covered instruments
Manual trade entry is available for covered instruments as well, both outright options and spreads. In the example below, the user has created a covered Call with a 42 Delta. When using the lot multiplier for covered instruments, the manual trade feature will automatically round the number of underlying lots to the nearest integer when fractional quantities are not allowed at the exchange. Users will always retain the ability to manually override the calculated number of underlying contracts before submitting the manual trade.


Once entered, both the options and underlying will be properly diplayed in the user's Portfolio.
