
Trade Allocations
Users with proper permissions have the ability to allocate trades from one account to another, or from one account to multiple accounts. In order to be authorized for trade allocations, a Risk Manager must make the request to Rival Support. Once permissions are in place, allocations are done from the Trade Book by employing manual trades. See more detail on this process in the Allocation Results section below.
Note that the allocation feature applies only to executed trades. It is not possible at this time to allocate existing positions into other accounts.
Selecting Trades
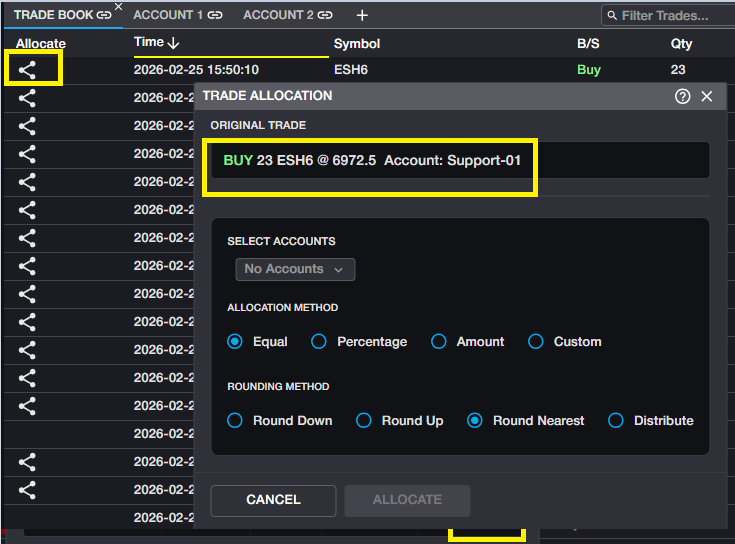
There are multiple ways to select trades to be allocated. To allocate fills from only one trade at a time, users should expose the Allocate column in the Trade Book.

Clicking on the Allocate icon will launch the Allocation window, where the trade will be displayed.
If users wish to allocate multiple trades at a time, the Select column is best used for selecting multiple trades:
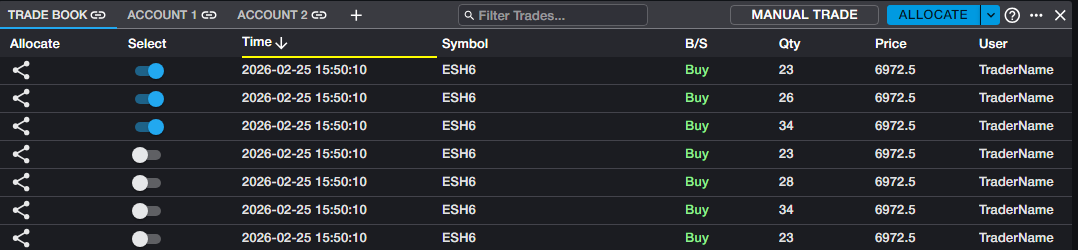
Once one or more trades has been selected, users will see the Allocate button exposed in the header of the Trade Book. From the Allocate button, users can select all or unselect all trades. This action will apply to all trades in the Trade Book.
Note that if the user has historical trades displayed in the Trade Book, the select/unselect all will apply to the historical trades which are displayed, and not only to the trades from the current session.

Once trades have been selected, clicking the Allocate button will launch the Allocation window.
Allocation Process
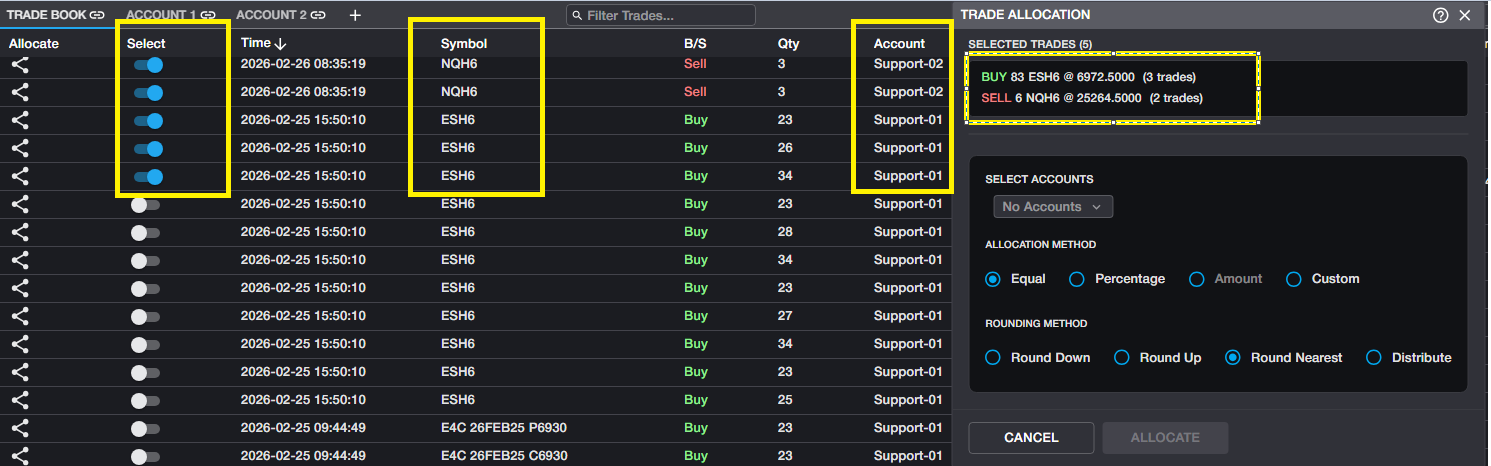
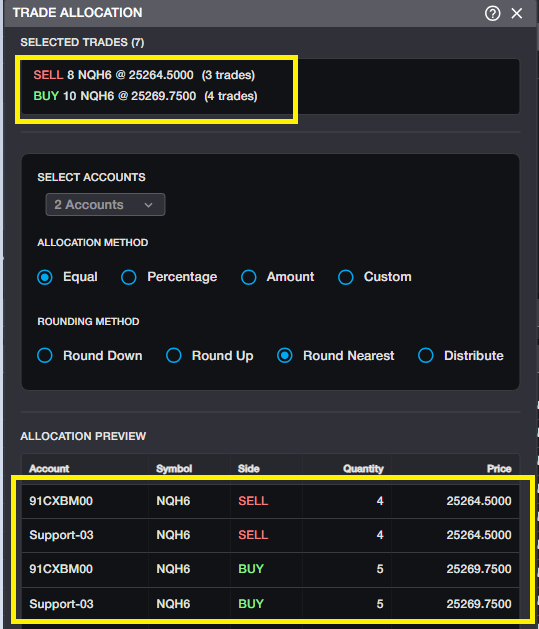
Once one or more trades have been selected for allocation and the window has been launched, users will first see a summary of all trades to be allocated in the top panel of the window. This summary will provide a breakdown by instrument and will separate buys from sells, in order to properly account for any P&L that is captured in the selected trades.
It is possible to allocate multiple instruments at one time as well as trades from multiple originating accounts:
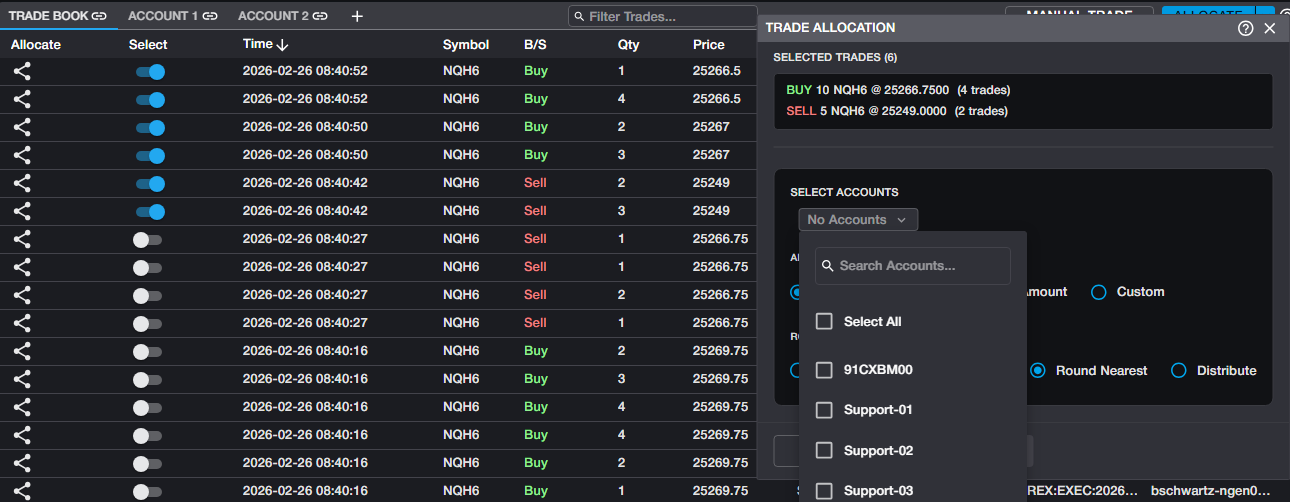
Next, users will select the destination accounts. All accounts to which the user has access will be displayed in the account dropdown
Once the destination accounts have been selected, users will determine the allocation method to be used.
Allocation Methods
Users have four methods available to determine the quantities that will be allocated to the destination accounts.
Equal: Divides the number of contracts for each instrument and each side (buy/sell) equally into the destination accounts. Quantities resulting in an uneven distribution will be handled by the rounding method in the next step.
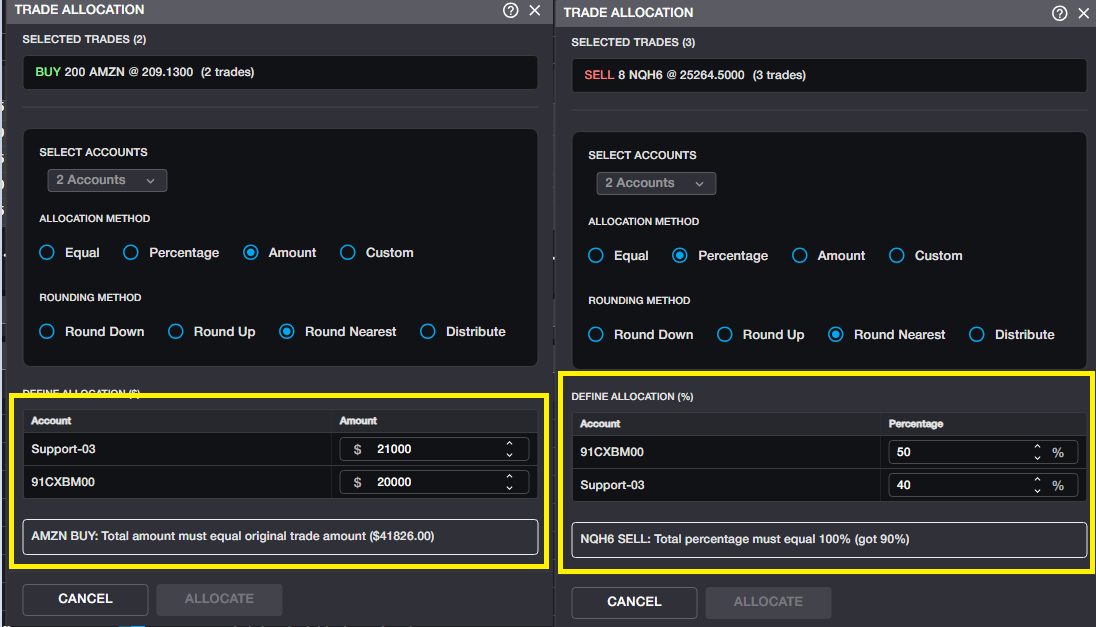
Percentage: Allows the user to determine the percentage of total quantity to be allocated into each account. This method is most useful in the case that users want an unequal distribution in the destination accounts.
Amount: Allows the user to determine the notional value of all trades to be allocated. This method is most useful for allocating equity trades and option trades, which carry a true premium. For futures trades, the NLV of the trades is calculated and makes this method less desirable.
Custom: Allows the user to specify exact quantities to be allocated into each destination account.
Note than when using Percentage, Amount or Custom, the allocated amount/qty must total 100% of the total qty from the original trades. If not, users will see a message like the one below and must adjust amount/qty before allocation is possible.
Rounding Methods
Users have 4 selections to choose from when determining how to handle unequal quantities via rounding.
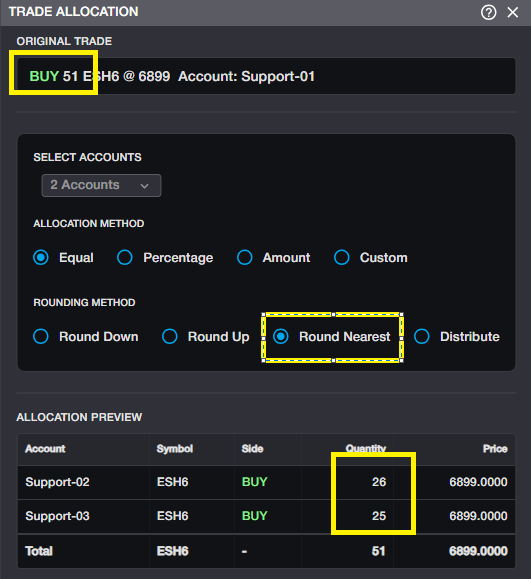
Round Nearest: aka 'Round Normal' will take any fractional quantities into account by rounding up for quantities equal or greater than .50 contracts. The allocations are done in order of account selection, which means that in most cases, an odd number of contracts will result in the first selected account rounding up and getting the "extra" contract(s). See example below:
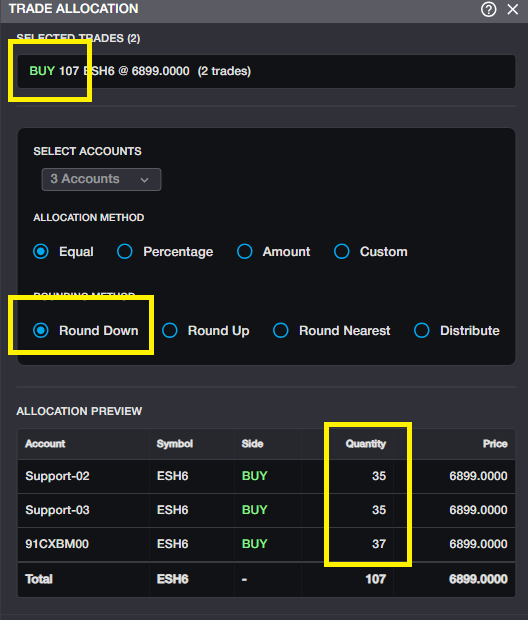
Round Up/Round Down: Will round fractional quantities up or down as specified, in each account. Any residual quantity will be allocated to the last selected account. See example:
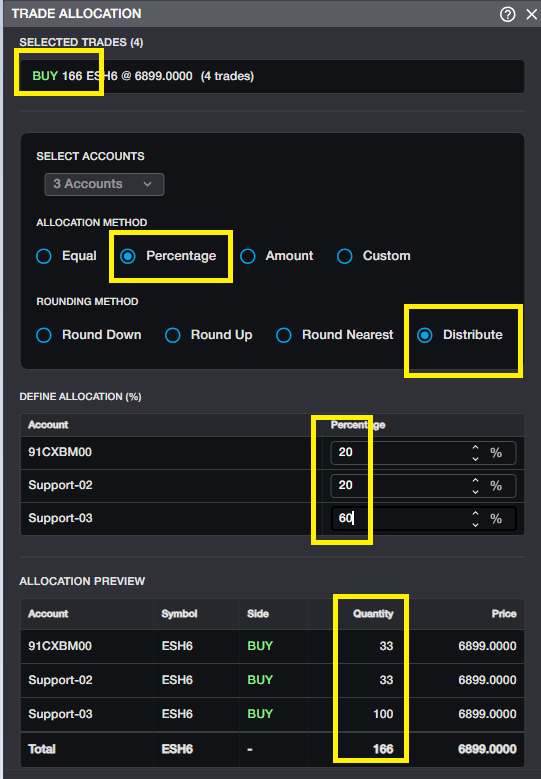
Distribute: Allocates contracts on a pro rata basis, so that the destination account(s) with the highest percentage(s) receive the residual quantity. This selection is most useful when allocating by percentage:
Allocation Preview
Once the destination accounts have been selected and the methods have been chosen, the Allocation window will provide a preview of instruments and quantities to be allocated to each destination account. Though allocations can be reverted, users are strongly advised to review the preview before executing the allocations.
Allocation Results
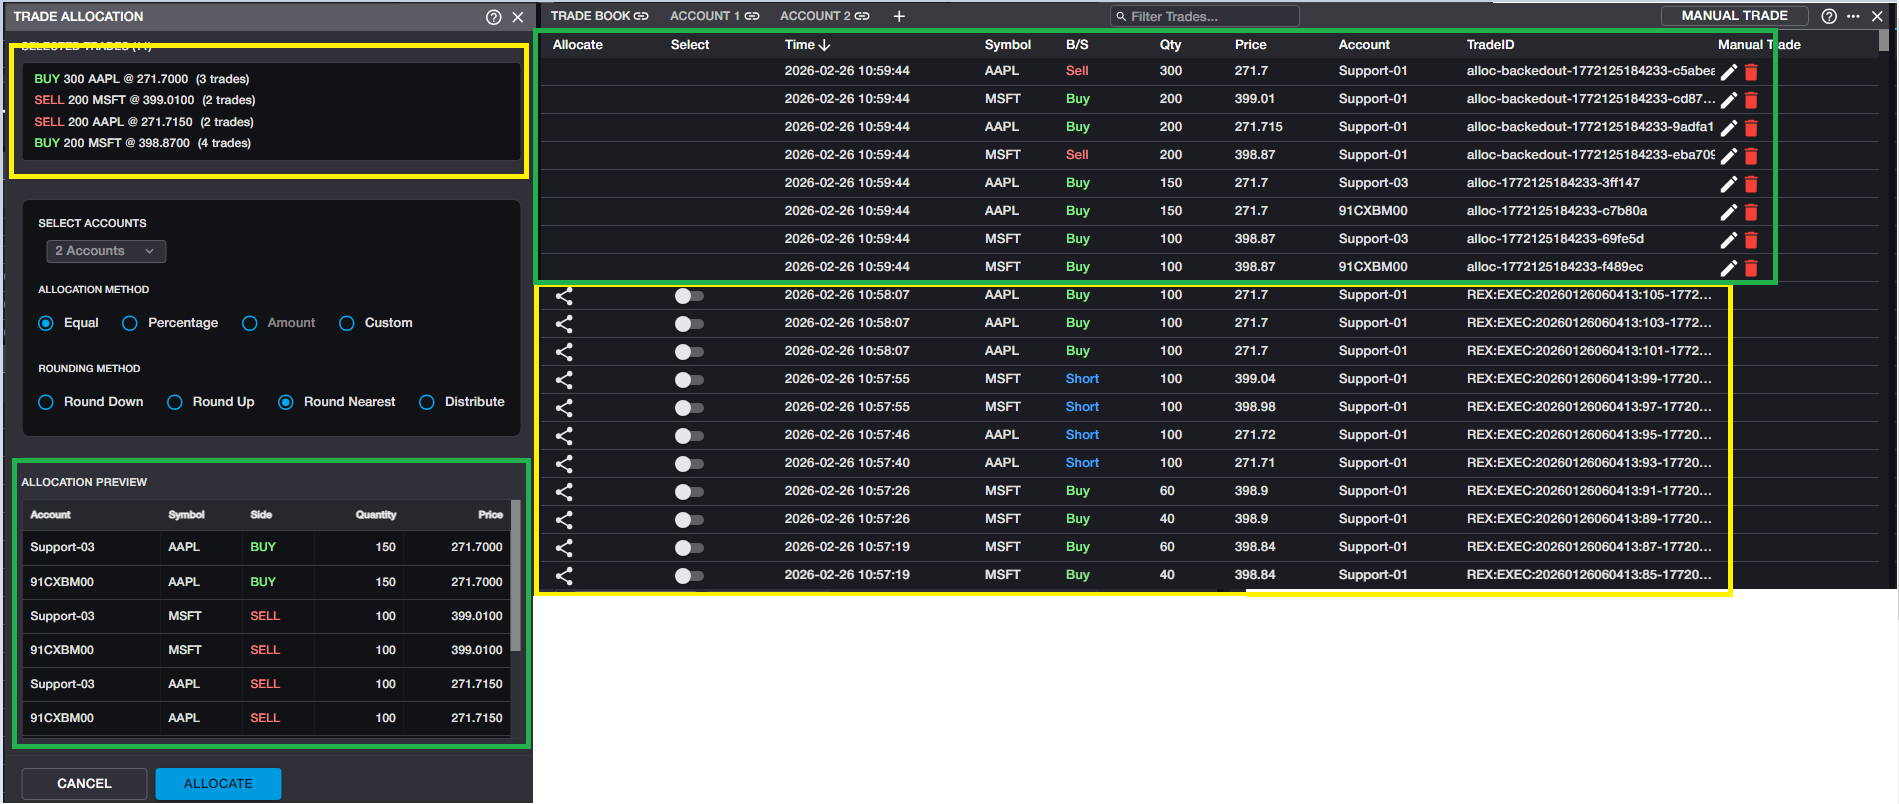
The allocation process makes use of manual trades. Once the user has confirmed their allocation choices above and executes the allocations, multiple manual trades will be displayed in the Trade Book. For each unique instrument and side (buy/sell) a manual trade will be entered to 'back out' the position from the originating account. For each allocation into the destination accounts, a manual trade will be entered to fulfill the details displayed in the Allocation preview.
In the example below, the trades highlighted in yellow are the trades that were executed into the originating account. The entries highlighted in green are the resulting manual trades.
For any allocated trades, the TradeID column will specify whether they are 'back out' trades or newly allocated trades.
Users have the ability to delete these manual trades in the case that a mistake was made and the allocation needs to be redone. However, caution is highly recommended when taking this step, to ensure accurate quantites in all accounts.